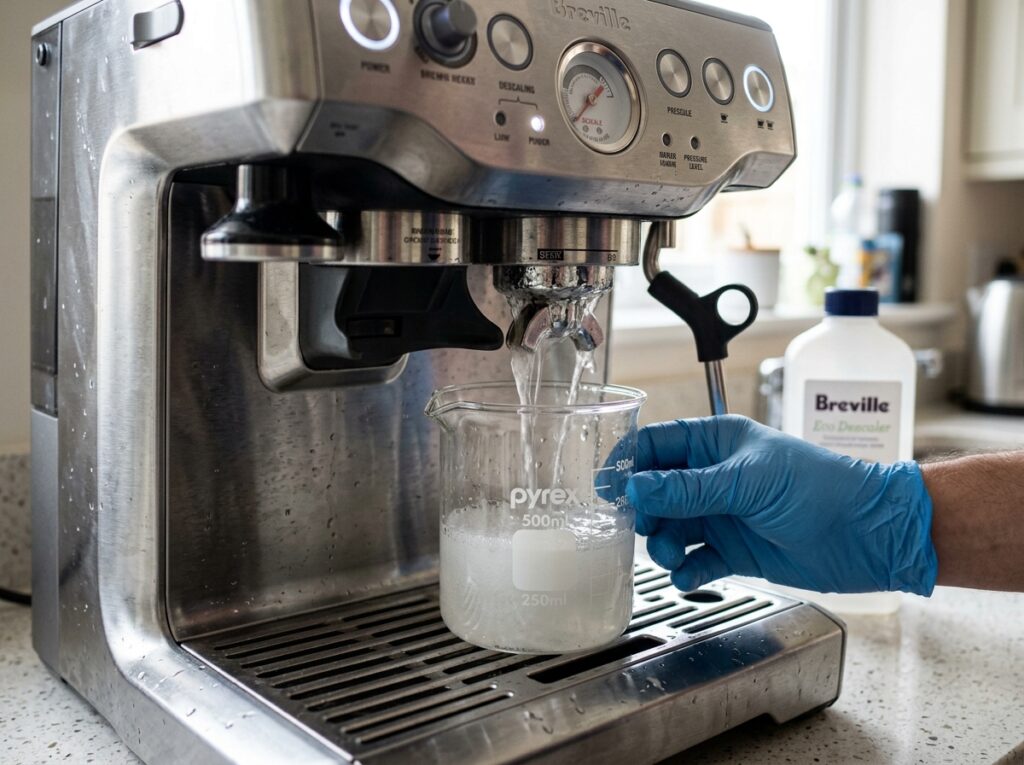
That shot of espresso you pulled this morning — did it taste a little off? Maybe weaker than usual, or slightly bitter in a way it shouldn’t be? There’s a good chance your Breville espresso machine is telling you something. Mineral buildup from your water supply quietly accumulates inside the boiler, pipes, and valves of your machine. Over weeks and months, this scale layer gets thick enough to mess with water flow, temperature, and ultimately, the flavor in your cup.
Descaling isn’t just some optional maintenance chore. It’s what keeps your Breville running the way it did on day one. And the good news? The whole process takes about 20 to 30 minutes, and you don’t need any special skills to do it. This Breville descale guide walks you through everything — the exact steps, the right products, timing, and the small details that most people overlook.
Why Scale Builds Up Inside Your Breville
Every drop of water that passes through your espresso machine carries dissolved minerals. Calcium and magnesium are the main culprits. When water heats up inside the thermocoil or boiler, these minerals separate out and cling to metal surfaces. Over time, you get a hard, chalky layer coating the internal components.
You won’t see it happening because it’s all inside the machine. But you’ll notice the effects. Water takes longer to heat up. The flow rate slows down. Your espresso starts tasting flat or sour. The machine might even make unusual noises during brewing.
Here’s the thing — the harder your water, the faster scale builds up. If you live in an area with hard water (most of the U.S., large parts of the UK, and many European cities), your Breville could develop noticeable scale deposits within just 3 to 4 weeks of regular use. Soft water areas buy you more time, but no water is completely mineral-free.
Quick fact: Breville machines have a built-in descale alert on most models. But don’t wait for that light. By the time it flashes, there’s already a significant amount of buildup inside.
How Often Should You Descale a Breville Espresso Machine?
Breville’s official recommendation is every 2 to 3 months for average use. But “average” doesn’t mean much when everyone’s water quality and usage habits differ.
A better way to think about it: if you’re making 2 to 4 drinks per day with unfiltered tap water, descale every 4 to 6 weeks. If you use filtered or bottled water, you can comfortably stretch that to every 2 to 3 months. And if you’re running a water softener at home, you might get away with once every 3 to 4 months.
Some Breville models — like the Barista Express, Barista Pro, Barista Touch, Oracle, and Dual Boiler — come with water hardness test strips in the box. Use one of those strips to check your water. Then program the hardness level into your machine’s settings. This helps the descale alert show up at the right time based on your actual conditions.
Pro Tip: Keep a simple reminder on your phone. Set it for every 6 weeks. Even if you skip one cycle, you’ll never go dangerously long without descaling.
What You’ll Need Before You Start
Gather everything before you begin. Once the descaling solution is in the tank, you want to work through the process without stopping.
You’ll need a descaling solution (Breville’s own product or a citric acid–based alternative), fresh water for rinsing, a large container or bowl to catch water from the group head and steam wand, a dry cloth, and about 25 to 30 minutes of uninterrupted time.
About the descaling solution: Breville sells its own descaling powder packets, and they work well. Each packet mixes with water in the reservoir. If you prefer a more budget-friendly option, food-grade citric acid powder (available at most grocery stores or online) works perfectly. Mix one tablespoon of citric acid into one liter of warm water. That ratio gives you a solution strong enough to dissolve calcium deposits without being harsh on the machine’s internals.
One word of caution — avoid white vinegar. You’ll find this advice all over the internet, and it’s not great for Breville machines. Vinegar has a strong odor that can linger inside the boiler and lines for weeks. It can also react with certain rubber seals and gaskets over time. Breville themselves specifically advise against vinegar in their user manuals.
How to Descale a Breville Espresso Machine: Step-by-Step
The descale espresso machine steps below apply to most popular Breville models, including the Barista Express (BES870), Barista Pro (BES878), Infuser (BES840), Barista Touch (BES880), Dual Boiler (BES920), and Oracle (BES980). Minor differences exist between models, and I’ll call those out where they matter.
Step 1 — Empty and Prepare the Machine
Turn off the machine and let it cool down if you’ve been using it recently. Remove the portafilter, the water filter (the small charcoal filter that sits inside the reservoir), and any coffee from the grinder hopper if you want to be extra cautious — though the descaling process doesn’t affect the grinder directly.
Take out the drip tray and empty it. Remove the water tank and rinse it out.
Step 2 — Mix and Add the Descaling Solution
If you’re using Breville’s descaling powder, dissolve one packet in the full water tank filled with warm (not hot) water. For citric acid, dissolve one tablespoon per liter of warm water. Fill the tank to the MAX line.
Place the tank back into the machine. Make sure it’s seated properly — a loose tank can cause the machine to show a “no water” error mid-cycle.
Important: Do not put the water filter back in. You want the descaling solution to flow through the system unfiltered.
Step 3 — Run the Descale Cycle
Here’s where it varies slightly by model.
For Barista Express, Infuser, and similar single boiler models: Power on the machine. Place a large container (at least 1 liter capacity) under the group head. Press the “1 Cup” button and let the solution run through the group head for about 30 seconds, then stop it. Wait 15 seconds. Repeat this process — 30 seconds on, 15 seconds off — until you’ve used about half the tank. This pulsing action helps the solution sit inside the thermocoil long enough to dissolve scale.
Now move your container under the steam wand. Open the steam valve and let the remaining solution flow through the wand until the tank is nearly empty. Close the valve.
For Barista Pro and Barista Touch: These models have a dedicated descale mode in the settings menu. Go to Menu > Maintenance > Descale. The machine will guide you through the process on the display. It’ll alternate between running solution through the group head and the steam wand automatically. Follow the prompts. The whole cycle takes about 20 minutes.
For Oracle and Dual Boiler: These machines have two separate boilers — one for brewing and one for steam. The descale process needs to clean both. Access the descale function through the menu. The Oracle’s touchscreen makes this straightforward. The Dual Boiler may require holding specific buttons during startup (check your model’s manual for the exact button combination, as Breville has updated this across hardware versions). The machine will flush solution through both boilers sequentially.
If you’re ever unsure about your specific model’s process, Breville has the full user manual available as a free PDF on their website. Just search your model number.
Step 4 — Rinse Thoroughly
This step is just as important as the descaling itself. Any leftover solution inside the machine will end up in your next cup of coffee, and trust me, that doesn’t taste good.
Empty the water tank completely. Rinse it well with fresh water. Fill it back to the MAX line with clean, cold water. Run the entire tank through the group head and steam wand just like you did with the solution — alternating between the two.
For the Barista Pro, Barista Touch, and Oracle, the machine will prompt you to do a rinse cycle after descaling. Follow those prompts.
Pro Tip: Run at least two full tanks of clean water through the machine if you used citric acid. It’s slightly harder to rinse out completely than Breville’s proprietary solution.
Step 5 — Reassemble and Test
Put the water filter back into the tank. Reinsert the drip tray. Fill the tank with fresh water. Pop the portafilter back in.
Power the machine on and let it reach brewing temperature. Pull a short shot of espresso — don’t drink it, just discard it. This flushes any remaining traces from the brew path. After that, you’re good to go. Your Breville is clean, clear, and ready to pull proper shots again.
Signs Your Breville Desperately Needs Descaling
Sometimes people ignore the descale light or just lose track of time. Here’s what happens when scale buildup gets serious. If you’re noticing any of these, don’t put it off another day.
Your espresso flows out painfully slow, almost dripping. The machine takes noticeably longer to heat up. You hear louder-than-normal sounds during brewing — almost a laboring, straining noise. The steam wand produces weak, sputtery steam instead of a strong, consistent flow. Your espresso tastes noticeably different — either flat and underwhelming, or oddly bitter and harsh. In extreme cases, the machine may show error messages or refuse to brew altogether.
One thing worth mentioning: if your Breville has reached a point where water barely comes through, a single descale cycle might not be enough. You may need to soak — fill the tank with descaling solution, run about a third of it through the system, then leave the machine off for 30 minutes to let the solution work on heavy deposits. Then finish the cycle. In rare cases, a second full descale immediately after the first does the trick.
If you’ve been dealing with troubleshooting issues on another machine at home, like a Keurig that’s acting up or a Cuisinart coffee maker giving you problems, scale is often the hidden villain there too. The same descaling principles apply across most coffee machines.
Breville Maintenance Tips Beyond Descaling
Descaling handles what’s going on inside the boiler and water lines. But a well-maintained Breville needs attention in a few other areas too. Think of descaling as one part of a bigger routine.
Keep the Group Head Clean
After every shot, remove the portafilter and flush water through the group head for 2 to 3 seconds. This rinses away leftover coffee oils and fine grounds. Once a week, use a blind filter (the rubber disc that came with your machine) and a small amount of Breville’s cleaning powder or a generic espresso machine cleaning tablet to backflush the group head. This dissolves oils that build up in the shower screen and three-way solenoid valve.
Backflushing takes about 5 minutes. Skip it consistently, and your espresso will develop a rancid, bitter undertone — even with fresh, perfectly roasted beans.
Clean the Steam Wand After Every Use
Milk residue dries fast. Within seconds of steaming, wipe the wand with a damp cloth and purge a quick blast of steam to clear any milk from the internal tip. If you let milk dry and harden on the wand, it blocks the steam holes and becomes a hygiene issue.
Once a week, soak the steam tip in warm water for 10 minutes to dissolve any dried milk that made it inside. A pin or needle can clear individual steam holes if they get clogged.
Replace the Water Filter Regularly
That small charcoal filter inside the reservoir does more than you might think. It removes chlorine, reduces mineral content slightly, and helps protect the machine from scale buildup between descaling cycles. Replace it every 2 months, or after about 60 liters of use — whichever comes first.
You can buy Breville replacement filters directly, or find compatible third-party options online. They’re inexpensive — usually around $5 to $8 each.
Wipe Down the Exterior
Coffee splatters and milk drips happen. Use a soft, damp cloth to wipe the machine’s body, drip tray area, and the area around the group head. Don’t use abrasive cleaners or anything with harsh chemicals on the stainless steel. A little dish soap on a cloth works perfectly.
What About Water Quality and Filtration?
If you really want to extend the life of your Breville and reduce how often you need to descale, pay attention to your water.
Tap water varies wildly depending on where you live. Hard water — water with high mineral content — is the main reason espresso machines develop scale. Cities like Phoenix, Las Vegas, San Antonio, and Indianapolis have notoriously hard water. On the flip side, Portland, Seattle, and New York City tend to have softer water.
Using a simple Brita or ZeroWater pitcher to filter your water before putting it in the reservoir makes a real difference. It won’t eliminate minerals completely (and you actually don’t want zero minerals — completely soft water tastes flat and can be corrosive to metal parts), but it reduces them enough to slow scale buildup significantly.
Some espresso enthusiasts go a step further and use Third Wave Water — mineral packets you add to distilled water to create an ideal mineral balance for both machine health and flavor extraction. It’s a bit geeky, but the results in the cup are noticeable.
Whatever you do, avoid using distilled water or reverse osmosis water straight from the tap without adding minerals back. Pure water with zero mineral content is actually aggressive on metal. It can corrode the inside of your boiler over time. Breville’s manual specifically warns against this.
Breville Descale Products: What Works and What Doesn’t
Let’s clear up the confusion around which descaling products are safe for Breville machines.
Breville’s own descaling powder is the safest bet. It’s formulated specifically for their machines, dissolves cleanly, and rinses out easily. A box of Breville descaling powder typically comes with four packets, and costs around $15 to $20. Each packet handles one descale cycle.
Food-grade citric acid is the best budget alternative. It’s effective, gentle on seals and gaskets, and readily available. One bag of citric acid from Amazon or your local store will last you a dozen descale cycles for a fraction of the cost.
Dezcal by Urnex is another popular option used widely in cafés and by home baristas. It’s a citric acid-based powder designed for espresso machines. Safe for Breville machines and very effective.
White vinegar? No. As mentioned earlier, it lingers, it smells, and it’s not great for your machine’s internal seals long-term. Skip it.
Lemon juice? Also no. It’s inconsistent in acidity, contains sugars and pulp, and can leave residue inside the machine. Stick to proper descaling agents.
How Descaling Affects Your Espresso Flavor
This is something most Breville descale guides skip over, and it’s actually one of the most interesting parts.
Scale buildup doesn’t just restrict water flow. It changes the temperature profile of your brew. An espresso machine with heavy scale has to work harder to heat water, and the heat distribution becomes uneven. Some water hits the coffee puck at the right temperature while other portions arrive slightly cooler. The result? Uneven extraction. You get a shot that’s simultaneously under-extracted (sour, thin) and over-extracted (harsh, bitter) at the same time.
After a proper descale, many people say their espresso tastes “brighter” and “cleaner.” They’re not imagining it. The machine is now heating water evenly and delivering it at consistent pressure. Your coffee grounds get extracted the way they’re supposed to.
If you’ve invested in a quality espresso machine — and Breville machines aren’t cheap, especially models like the Oracle or other high-end espresso machines — it makes sense to maintain it properly so you actually taste what your coffee has to offer.
Speaking of getting the most out of your coffee setup, knowing how much coffee to use per scoop and understanding the difference between drinks like a caffè misto and a latte can make a real difference in your home espresso experience.
Breville Model-Specific Notes
Not every Breville machine handles descaling the same way. Here are some model-specific details worth knowing.
Barista Express (BES870XL)
This is Breville’s most popular model, and it doesn’t have a dedicated descale mode in its menu. You’ll run the solution manually through the group head and steam wand as described in the step-by-step section above. The descale alert light appears on the front panel — it looks like a small droplet icon.
Barista Pro (BES878)
The Pro has a digital display with a built-in descale program. Navigate to Menu > Maintenance > Descale. The machine walks you through the entire process on screen. Much simpler than the Barista Express.
Barista Touch (BES880)
Similar to the Pro, the Touch has a touchscreen-guided descale cycle. It’s the easiest of all Breville models to descale because the instructions appear right on the display in real time.
Oracle and Oracle Touch (BES980/BES990)
These are Breville’s flagship models with dual boilers and automatic milk texturing. Descaling is more involved because both boilers need cleaning. The Oracle Touch has a menu-guided process. The original Oracle may require a button combination to enter descale mode — hold the “Menu” button for several seconds on startup. Because these machines are more complex (and more expensive), sticking to the recommended descale schedule is especially important. Repair costs for a neglected Oracle are significant.
Dual Boiler (BES920)
The Dual Boiler shares the dual boiler design with the Oracle but lacks some of the automation. Descaling requires attention to both boiler circuits. Breville’s user manual for this model has a very clear step-by-step section — it’s worth reading through it once before your first descale.
If you’ve been comparing Breville machines with other brands, you might find our DeLonghi vs Breville comparison helpful for understanding how maintenance needs differ across brands. And if you’re a Nespresso user as well, the Nespresso Vertuo vs Original breakdown covers capsule machine maintenance too.
FAQ
Can I use vinegar to descale my Breville espresso machine?
Breville advises against using vinegar. It leaves a lingering odor that’s hard to rinse out, and over time it can deteriorate rubber seals and gaskets inside the machine. Stick with Breville’s own descaling powder, food-grade citric acid, or a product like Urnex Dezcal. These are all safer and more effective.
How do I know when my Breville needs descaling?
Most Breville models have a built-in descale indicator light or an on-screen alert. You’ll also notice slower water flow, longer heat-up times, weaker steam pressure, and changes in espresso flavor. Even if the alert hasn’t triggered, descaling every 4 to 8 weeks is a good habit depending on your water hardness.
Does descaling void my Breville warranty?
No — regular descaling is actually part of Breville’s recommended maintenance. What can affect your warranty is using improper products (like vinegar) or performing unauthorized repairs. Descaling with an appropriate solution is expected and encouraged by Breville.
How long does the Breville descale process take?
The full process — mixing the solution, running it through the machine, and rinsing with clean water — takes about 20 to 30 minutes. Models with built-in descale programs (Barista Pro, Barista Touch, Oracle Touch) tend to be on the shorter end because the machine automates the timing.
Can I use my Breville immediately after descaling?
Yes, as long as you’ve completed the rinsing step properly. Run at least one full tank of clean water through the group head and steam wand after descaling. Pull one throwaway shot before making your first drinkable espresso. This ensures no descaling solution remains in the brew path.
Keep Your Breville Running Like New
Your Breville espresso machine is a real investment — not just in money, but in the daily ritual of great coffee at home. Descaling is the single most impactful thing you can do to protect that investment. It takes half an hour, costs practically nothing, and the difference in your espresso’s taste and the machine’s performance is immediately obvious.
Set a reminder, pick up some citric acid or Breville’s descaling powder, and make it part of your routine. Your machine will run better, your espresso will taste the way it should, and you’ll avoid expensive repairs down the line. That next shot you pull after a fresh descale? You’ll taste the difference from the first sip.