Your alarm just went off. You’re barely awake. You stumble into the kitchen, pop a K-Cup into your Keurig, hit the brew button… and nothing happens. No gurgling. No coffee. Just silence and a blinking light mocking you at 6 AM.
If you’ve been there, you’re not alone. Keurig machines are incredibly popular — they sit on countertops in roughly 40 million American households — but they’re also machines. And machines break down, act weird, and throw tantrums when you least expect it. The good news? Most Keurig problems don’t need a repair technician or a replacement. A little Keurig troubleshooting know-how, and you can get your coffee flowing again in minutes.
This guide walks you through the most common Keurig issues, what actually causes them, and step-by-step fixes that work. Whether your Keurig isn’t brewing, showing strange error codes, or just behaving oddly, you’ll find your answer here.
Why Your Keurig Stops Working (The Real Reasons)
Before jumping into specific fixes, it helps to understand why Keurig machines run into trouble. Most people assume something’s seriously broken, but the reality is usually much simpler.
Keurig brewers — whether you own a K-Classic, K-Elite, K-Mini, K-Supreme, or one of the newer K-Cafe models — share a common internal design. Water gets pulled from a reservoir, heated by an internal element, then pushed through a needle that punctures the K-Cup. Coffee flows out. Simple enough, right?
The problem is that this system has several weak points. Mineral buildup from hard water is the single biggest culprit behind most Keurig failures. Over time, calcium and limescale clog the internal water lines, slow down the heating element, and reduce water flow. If you’ve never descaled your Keurig and you’ve owned it for more than three months, there’s a good chance scale buildup is causing your issue right now.
Beyond that, clogged needles, air bubbles trapped in the water line, and reservoir sensor failures account for most of the remaining problems. The fix is almost always something you can handle at home with zero tools.
Keurig Not Brewing: The Most Common Problem
This is the issue that brings most people to a troubleshooting guide. You press the brew button, the machine sounds like it’s trying to work, but either nothing comes out or you get just a trickle of lukewarm water.
Here’s what’s likely going on and how to fix it.
Check the Water Reservoir First
It sounds obvious, but the reservoir might not be seated properly. Keurig reservoirs are removable on most models, and if they’re even slightly misaligned, the machine won’t detect water. Pull the reservoir off completely, empty it, then place it back firmly until you hear or feel it click into position.
Also check the small magnet or sensor at the bottom of the reservoir. Some Keurig models use a magnetic sensor to detect water levels. If debris or coffee residue is blocking it, the brewer thinks there’s no water even when the tank is full. Wipe the contact points with a damp cloth and try again.
Clear the Air Lock
Air bubbles trapped inside the water line are a surprisingly common reason your Keurig won’t brew. This tends to happen after the machine has been sitting unused for a while, or after you’ve moved it from one spot to another.
The fix is straightforward. Unplug the machine, remove the water reservoir, and give the brewer a few firm (but gentle) taps on the sides and bottom. This helps dislodge trapped air. Fill the reservoir with fresh water, plug the machine back in, and run two or three brew cycles without a K-Cup — just plain water through the system. That usually clears the air lock completely.
Unclog the Needles
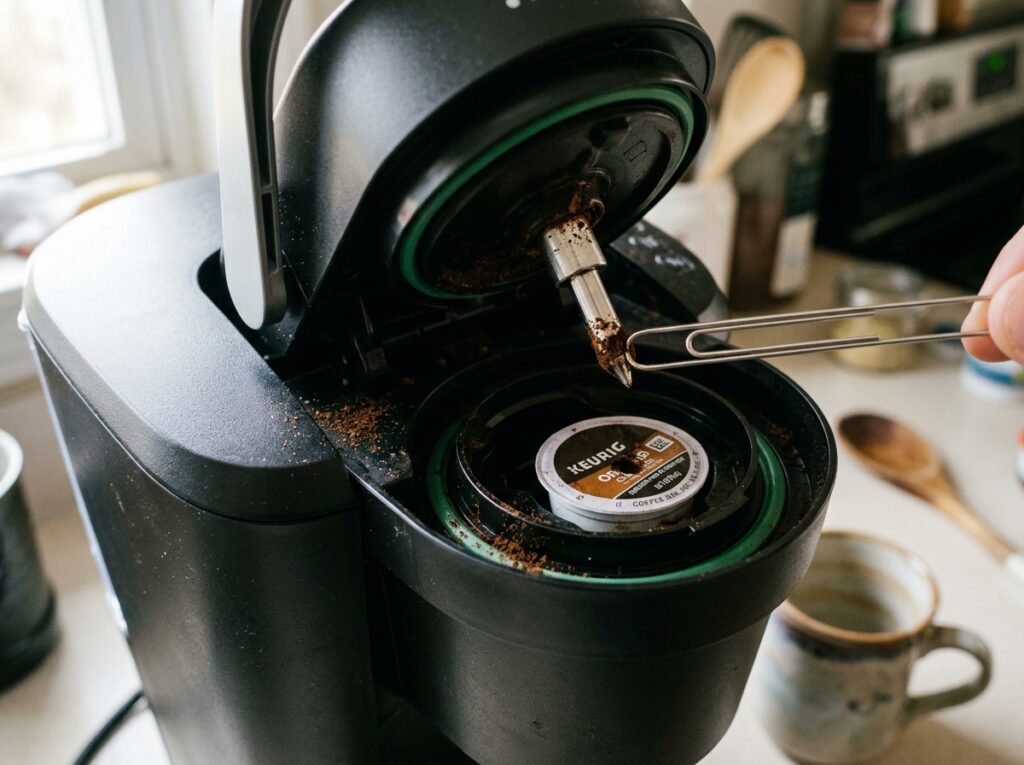
Your Keurig has two needles. The top needle punctures the foil lid of the K-Cup, and the bottom needle pokes through the base. Both needles have tiny openings that can get clogged with coffee grounds, tea residue, or dried cocoa powder (especially if you use hot chocolate K-Cups).
Keurig includes an orange cleaning tool (called the Keurig Brewer Maintenance Accessory) with many of their newer models. If you have it, fill the silicone bulb with water, snap it into the K-Cup holder, and open and close the lid five or six times. That pushes water through the needle and clears blockages.
Don’t have the tool? A straightened paper clip works perfectly. Power off and unplug the machine first. Lift the handle, locate the needle inside the K-Cup holder (it’s the sharp metal piece at the top), and carefully insert the paper clip into the small hole. Wiggle it gently to break up any debris. Do the same for the exit needle at the bottom of the pod holder. Run a couple of water-only cycles after cleaning to flush everything out.
If you enjoy your coffee experience and want to keep your equipment running smoothly — whether it’s a Keurig, an espresso machine, or a standard drip brewer — regular maintenance matters. Those who own Breville espresso machines deal with similar descaling challenges and know how important clean internals are.
Keurig Error Codes and What They Actually Mean
Newer Keurig models (especially the K-Supreme, K-Supreme Plus, K-Duo, and K-Cafe Smart) display digital error messages. These can feel intimidating, but most of them point to simple fixes.
“Add Water” (Even When the Tank Is Full)
This is probably the most frustrating Keurig error because you can clearly see water sitting in the reservoir. The issue is almost always one of three things: the reservoir isn’t seated correctly, the water sensor is dirty, or there’s a minimum water level the machine requires that you haven’t hit.
Remove the reservoir, wash it with warm soapy water, dry the sensor area, refill with fresh water past the minimum line, and reseat it firmly. That fixes this error about 90% of the time.
“Descale” Warning
When your Keurig displays “Descale,” it’s telling you that mineral buildup has reached a level where it’s affecting performance. This isn’t something you should ignore or reset without actually descaling. We’ll cover the full descaling process in a section below, but know that this message means your machine genuinely needs cleaning.
Pro Tip: Some people try to reset the descale light by holding certain button combinations. While that clears the warning, it doesn’t fix the underlying problem. Your coffee will still taste off, brew temperatures will be inconsistent, and eventually the machine will stop working entirely. Take the 20 minutes to actually descale it.
“Prime” Error
Keurig K-Duo and K-Duo Plus owners see this one a lot. “Prime” means the machine can’t draw water into the heating system. It’s usually caused by an air lock, scale buildup, or a reservoir issue.
Start by removing and reseating the reservoir. If that doesn’t work, fill the reservoir with water, then use a turkey baster or syringe to gently push water into the intake valve at the base of the reservoir slot. This helps break the air lock. Run several water-only brew cycles afterward.
Blinking Lights (No Text Display)
Older Keurig models like the K-Classic and K-Select don’t have screens — they communicate through blinking lights. A solid blue light usually means the machine is heating. Blinking lights often indicate the water reservoir needs attention or the machine needs to be reset.
The universal fix for blinking light issues: unplug the machine, remove the reservoir, wait five minutes, plug it back in, reseat the reservoir, and power on. This soft reset resolves most blinking light situations.
Your Keurig Isn’t Heating Water Properly
Getting a cup of lukewarm coffee from your Keurig defeats the entire purpose. If your brew is coming out cool or barely warm, here’s what to look at.
Scale buildup on the heating element is the most common cause. When calcium deposits coat the heating element, it can’t transfer heat to water efficiently. Descaling (covered below) is your fix.
Another common reason is running multiple cups back to back without giving the machine time to reheat. Keurig brewers heat water on demand, and if you’re brewing five cups in rapid succession for the family, the water temperature drops with each cycle. Give the machine 30-60 seconds between brews to let the heater catch up.
Some Keurig models — particularly the K-Elite and K-Supreme Plus — have temperature control settings. Check if someone accidentally lowered the temperature. You can adjust this in the machine’s settings menu.
If descaling and temperature settings don’t solve it, try this: brew a large cup size (10 or 12 oz) with no K-Cup, discard the hot water, and then immediately brew your actual coffee. That first cycle pre-heats the internal components and your next cup will be noticeably hotter.
How to Descale a Keurig (Step by Step)
Descaling is the single most important maintenance task for any Keurig owner. Keurig recommends descaling every three to six months, but if you have hard water, you might need to do it every eight weeks.
You can use Keurig’s own descaling solution or a DIY alternative. White vinegar works — use a 1:1 ratio of white vinegar to water. Some people prefer citric acid powder (about one to two tablespoons dissolved in a full reservoir of water), which works just as well and doesn’t leave a vinegar smell behind.
Here’s the process. Empty the water reservoir completely and remove any water filter cartridge if your model has one. Fill the reservoir with your descaling solution (either the commercial product, the vinegar mix, or the citric acid solution). Place a large mug on the drip tray.
Run the largest brew cycle with no K-Cup in the holder. Let the solution dispense into the mug. Dump the mug and repeat until the reservoir is empty and the machine tells you to add water. Now here’s the step most people skip — leave the machine powered on with the empty reservoir for 30 minutes. This lets the remaining solution soak inside the internal lines and break down stubborn deposits.
After 30 minutes, rinse the reservoir thoroughly, fill it with fresh clean water, and run at least three to four full rinse cycles to flush out all the descaling solution. You don’t want your next cup of coffee tasting like vinegar.
Quick Fact: Keurig says you should use their branded descaling solution, but independent tests show that white vinegar and food-grade citric acid perform equally well. The branded solution costs around $7-10 per use, while vinegar costs pennies.
Coffee lovers who also own espresso machines know this routine well. Breville owners, for instance, follow a similar descaling process to keep their machines performing at their best.
Keurig Brewing Weak or Watery Coffee
Your Keurig is working, water is hot, but the coffee tastes like slightly brown water. This is a really common complaint, and the fix depends on what’s causing it.
The first thing to check is your cup size setting. If you’re selecting the 10 or 12 oz brew size with a standard K-Cup that’s designed for 6-8 oz, you’re pushing too much water through the same amount of coffee. The result is a diluted, weak cup. Try dropping down to the 8 oz setting and see if that improves things.
K-Cup quality matters too. Not all K-Cups are created equal. Budget K-Cups and third-party pods sometimes have less coffee inside or use a coarser grind that extracts poorly in the quick Keurig brew time. If you’ve recently switched brands and noticed weaker coffee, that’s likely your answer.
Needle clogs can also cause weak coffee. If the top needle is partially blocked, it won’t puncture the K-Cup cleanly, and water channels around the coffee instead of flowing through it evenly. Clean both needles using the paper clip method described earlier.
If you use a reusable K-Cup filter, the grind size of your coffee makes a big difference. Too coarse and water rushes through without extracting flavor. Aim for a medium-fine grind — finer than drip coffee but not as fine as espresso. And don’t overfill the reusable filter past the max line, because the grounds need room for water to flow through them.
Want to understand how caffeine content varies across different coffee and drink formats? The amount of caffeine in a single tablespoon of coffee might surprise you — and it puts K-Cup strength into perspective.
Keurig Leaking Water
Water pooling under your Keurig or dripping from the K-Cup holder is annoying and messy. Here’s where to look.
Check the drip tray. It might simply be full. Keurig drip trays collect overflow water, and if they haven’t been emptied in a while, water spills onto the counter. Pull out the drip tray, dump it, and replace it.
Inspect the reservoir for cracks. Hold it up to the light and look for hairline cracks, especially near the bottom and around the handle area. Even a tiny crack causes slow leaking. If you find one, you’ll need a replacement reservoir — Keurig sells them separately for most models.
K-Cup holder area leaking usually means the upper needle area has debris buildup that’s preventing a proper seal when the handle is closed. Clean the needle, clear away any old grounds stuck around the pod holder gasket, and make sure the K-Cup is seated properly before closing the handle. Using bloated or damaged K-Cups can also prevent a tight seal.
Water leaking from the bottom of the machine is more concerning. This could indicate a cracked internal hose or a failing seal inside the brewer. If your machine is still under Keurig’s one-year warranty, contact their support team. If it’s out of warranty and the leak is significant, it might be time for a replacement.
Keurig Keeps Shutting Off or Won’t Turn On
If your Keurig randomly shuts off mid-brew or won’t power on at all, don’t panic.
Most Keurig models have an auto-off feature that powers down the machine after a set period of inactivity (usually 2 hours on the K-Classic, adjustable on newer models). Check your settings — you might have the auto-off timer set too short.
Won’t turn on at all? Start with the basics. Make sure the outlet works by plugging something else into it. Try a different outlet. Check the power cord for damage. These sound too simple, but they solve the problem more often than you’d think.
If the outlet is fine and the cord looks good, do a hard reset. Unplug the Keurig, remove the water reservoir, and let it sit unplugged for at least 15-30 minutes. Some people report success after leaving it unplugged overnight. This lets the internal electronics fully discharge and reset. Plug it back in, reattach the reservoir, and power on.
For touchscreen models that freeze or become unresponsive, holding the power button for 10 seconds forces a restart. If the screen stays blank after a hard reset, the control board might have failed — that’s a repair or replacement situation.
Keurig Making Strange Noises
A healthy Keurig makes a gentle humming and gurgling sound during brewing. That’s normal — it’s the pump pushing water through the system. But some noises signal a problem.
Loud clicking or popping during brewing usually means the pump is struggling. Air in the water line is the most common cause. Follow the air lock fix described earlier (unplug, tap the machine, run water-only cycles).
Excessive gurgling or sputtering often points to low water in the reservoir or a partially clogged water line. Refill the reservoir and try a descale cycle.
Grinding noises aren’t common in Keurigs since they don’t have grinders, but a harsh vibrating sound might indicate a failing pump motor. If the machine is older than three years and making grinding noises, the pump may be wearing out.
Preventive Maintenance That Actually Works
You can avoid most Keurig problems with a minimal maintenance routine. This doesn’t take much time, and it dramatically extends the life of your machine.
Use filtered water instead of tap water. This single change reduces mineral buildup by 50-80%, depending on how hard your local water is. Keurig models with built-in water filter slots (like the K-Classic and K-Elite) should have their filters replaced every two months or after 60 reservoir refills — whichever comes first.
Descale every three months. Put it on your calendar. Don’t wait for the descale warning to appear. By the time the light comes on, buildup has already been affecting your coffee quality for weeks.
Clean the needles monthly. A quick pass with a paper clip or the Keurig cleaning tool takes 30 seconds and prevents clogs before they happen.
Empty and rinse the reservoir weekly. Standing water in the reservoir can develop bacteria and algae, especially in warm kitchens. A quick rinse with warm soapy water keeps it fresh.
Don’t leave a used K-Cup sitting in the holder. This is a small thing, but wet grounds sitting against the needle promote mold growth and cause clogs over time. Pop out the used pod right after brewing.
If you’re someone who appreciates a great cup of coffee from any source — Keurig at home, Dunkin’ on the go, or Starbucks when the mood strikes — keeping your equipment clean makes all the difference in taste.
When to Replace Your Keurig Instead of Fixing It
Not every Keurig problem is worth fixing. Here are some honest guidelines.
If your machine is less than one year old, contact Keurig’s customer support before trying major repairs. Their standard warranty covers defects in materials and workmanship. They’re known for being reasonably generous with replacements.
If your brewer is one to three years old and the issue is fixable with descaling, needle cleaning, or a reset, those fixes are absolutely worth it. These machines typically retail between $80 and $200, and there’s no reason to replace one over a clogged needle.
If your Keurig is over four to five years old and you’re dealing with internal leaks, a dead heating element, or a failing pump that doesn’t respond to any troubleshooting, replacement makes more financial sense than repair. Keurig doesn’t offer cost-effective repair services for out-of-warranty machines, and third-party repair often costs more than a new unit.
Warning: If you ever see sparking, smell burning plastic, or notice scorch marks on your Keurig, stop using it immediately. Unplug it and don’t attempt any DIY repair. That’s an electrical safety issue.
For those thinking about their next coffee setup, comparing options like Nespresso Vertuo vs Original or looking at the best dual coffee makers might give you a better sense of what’s available beyond Keurig.
FAQ
Why is my Keurig not brewing even though it has water?
The most likely causes are an improperly seated water reservoir, a clogged needle, or an air lock in the water line. Remove and reseat the reservoir firmly, clean both the entrance and exit needles with a paper clip, and run two to three water-only brew cycles to clear any trapped air. If the “Add Water” indicator stays on despite the tank being full, wipe the water sensor area at the base of the reservoir slot with a clean damp cloth.
How do I reset my Keurig?
Unplug the machine from the wall outlet. Remove the water reservoir and leave the machine unplugged for at least 15 minutes (30 minutes is better for persistent issues). Reattach the reservoir filled with fresh water, plug the machine back in, and power it on. This soft reset clears most electronic glitches, frozen displays, and sensor errors. For touchscreen models, holding the power button for 10 seconds before unplugging can help force a full restart.
How often should I descale my Keurig?
Keurig officially recommends descaling every three to six months. If you have hard water or use your Keurig heavily (multiple cups daily), aim for every two to three months. Using filtered water significantly reduces how often you need to descale. You can use Keurig’s branded descaling solution, white vinegar mixed 50/50 with water, or food-grade citric acid dissolved in water — all three methods work effectively.
What does the “Prime” error mean on a Keurig?
The “Prime” error appears primarily on Keurig K-Duo and K-Duo Plus models. It means the machine can’t pull water from the reservoir into the heating system, usually because of an air lock or mineral buildup blocking the water intake. Remove and reseat the reservoir, gently push water into the intake valve using a turkey baster, and run several water-only cycles. If the error persists after these steps, a full descale cycle typically resolves it.
Can I use vinegar instead of Keurig descaling solution?
Yes. White vinegar is an effective and affordable descaling agent. Mix equal parts white vinegar and water, fill the reservoir, and run the descaling process as you normally would. The only downside is that vinegar can leave a lingering taste and smell, so you’ll want to run at least four to five fresh water rinse cycles after descaling. Citric acid is another alternative that descales equally well without the strong odor.
Keep Your Keurig Running Strong
Most Keurig problems come down to three things: mineral buildup, clogged needles, and air bubbles. That’s it. The fixes are simple, they don’t cost much, and they take less time than driving to a coffee shop because your brewer decided to quit on you.
The one thing that separates people who love their Keurig for five years from those who replace it every 18 months? Regular maintenance. A quick descale every few months, clean needles, filtered water, and a weekly reservoir rinse. That’s your whole checklist.
If you’ve tried everything in this guide and your machine still isn’t cooperating, Keurig’s support team (reachable at 1-866-901-2739) is your next call. They’re helpful, and if your machine is under warranty, they’ll often send a replacement without much hassle. Your morning coffee routine is worth protecting — and now you have the know-how to do exactly that.