Your Cuisinart coffee maker has been your loyal morning companion for months — maybe years — and then one random Tuesday, it just… refuses to cooperate. No brewing, weird beeping, water leaking everywhere, or coffee that tastes like it was filtered through a gym sock.
Before you toss it in the trash or start shopping for a replacement, take a breath. Most Cuisinart coffee maker problems are surprisingly fixable at home, and you don’t need to be mechanically gifted to pull it off. About 80% of the issues people run into with their Cuisinart brewers come down to mineral buildup, clogged components, or simple user errors that take minutes to correct.
This is your go-to resource for Cuisinart coffee maker troubleshooting — real fixes for real problems, organized so you can find your specific issue and get your coffee flowing again.
Why Your Cuisinart Coffee Maker Stops Working (The Bigger Picture)
Before jumping into specific problems, it helps to understand why Cuisinart brewers act up. It’s rarely a catastrophic failure. Most issues trace back to a handful of root causes, and once you know them, you’ll start recognizing patterns.
Mineral buildup is the number one culprit. If you’re using tap water — and most of us are — calcium and lime deposits quietly accumulate inside the water lines, heating element, and valves. Over time, this buildup restricts water flow, messes with temperature, and triggers error codes. Think of it like cholesterol clogging arteries. Your machine isn’t broken; it’s just struggling to push water through narrow, crusty passages.
The second big one is coffee ground residue. Old grounds get into places you wouldn’t expect — the brew basket housing, the showerhead above the basket, even the carafe lid mechanism. This residue causes clogs, off-tasting coffee, and overflow issues.
Then there’s the electrical and mechanical side — faulty power connections, worn-out seals, misaligned lids, and sensor errors. These are less common but still very fixable in most cases.
Knowing these root causes matters because the same descaling or deep-cleaning process often fixes multiple symptoms at once. You might come here for one problem and accidentally solve two others you hadn’t even noticed yet.
Cuisinart Coffee Maker Not Working At All
This is the most panic-inducing scenario. You hit the power button and get absolutely nothing — no lights, no sounds, no signs of life. Your brain immediately jumps to “it’s dead,” but don’t write the obituary just yet.
Check the Obvious Stuff First
Yes, this sounds patronizing, but you’d be surprised how often the fix is something embarrassingly simple. Make sure the power cord is firmly plugged into both the wall outlet and the back of the machine. Cuisinart cords can work themselves slightly loose over time, especially if the machine sits on a counter where it gets bumped.
Try plugging something else into the same outlet — a phone charger, a lamp, anything. If that outlet is controlled by a wall switch (common in kitchens), someone might have flipped it off without realizing. You can also try a different outlet entirely to rule out a tripped breaker.
The GFCI Reset Trick
Here’s one that catches a lot of people. Kitchen outlets are usually GFCI-protected (those outlets with the little “Test” and “Reset” buttons). If the GFCI tripped — which can happen during a power surge or even from running too many appliances — your outlet looks fine but delivers zero power. Press that Reset button on the outlet. It’s such a simple fix, but forums are full of people who almost bought new machines before discovering this.
The Internal Safety Shutoff
Cuisinart brewers have a built-in safety feature that shuts the machine off if it overheats. If you’ve been running it hard — back-to-back pots, or if it’s been sitting on with an empty carafe — the thermal fuse may have tripped. Unplug the machine and leave it alone for 30 minutes. Let it cool completely, then try again.
If none of this works, there’s a hard reset method. Unplug the machine, hold down the power button for 10 seconds (while unplugged), then wait a full minute before plugging it back in. This drains residual charge from the capacitors and resets the internal electronics. It’s the coffee maker equivalent of “turning it off and on again,” and it genuinely works more often than you’d expect.
⚠️ Warning: If you notice a burning smell, frayed cord, or scorch marks near the plug, stop using the machine immediately. That’s an electrical safety issue, not a troubleshooting situation. Contact Cuisinart’s customer support or replace the unit.
Cuisinart Error Codes and What They Mean
Some Cuisinart models display error codes on their LCD screens, and these can be confusing if you don’t know the language. Here’s what you’re most likely to see and what to do about each one.
Err 1 — Lid or Cover Issue
This code pops up when the machine thinks the lid, brew basket, or K-cup holder isn’t properly seated. The sensor that detects closure is either blocked or not making contact. Remove the lid or brew basket completely, wipe the contact points with a damp cloth, and reseat everything firmly. Sometimes a tiny bit of coffee ground gets stuck on the sensor — that’s all it takes to trigger this error.
Err 2, Err 3, Err 4 — Internal System Errors
These typically relate to internal temperature sensors, water flow problems, or pump issues. Your best first move is a full unplug-and-reset — leave the machine unplugged for five minutes, then power it back on. If the error persists, run a descaling cycle (more on this below). Mineral buildup is the most frequent reason behind Err 2 and Err 3 on models like the Cuisinart DCC-3200 and DCC-3400.
The Clean Light
Technically not an error code, but plenty of people treat it like one. When the “Clean” indicator lights up on your Cuisinart, it’s telling you mineral deposits have built up enough to affect performance. This isn’t optional maintenance — ignoring this light leads to slower brewing, lukewarm coffee, and eventually, a machine that won’t brew at all.
Quick Fact: Cuisinart recommends descaling every 3–6 months depending on your water hardness. If you have very hard water, you might need to do it monthly. The clean light typically triggers after about 60 brew cycles, though this varies by model.
Your Cuisinart Brews Slowly or Only Makes Half a Pot
You set it up for 12 cups, walk away, come back, and find maybe 6 cups in the carafe with the machine still gurgling and struggling. This is one of the most common Cuisinart brewer problems, and the diagnosis is almost always the same: restricted water flow.
The Descaling Solution
Mineral deposits inside the water reservoir, tubing, and heating chamber create a bottleneck. Water can only trickle through instead of flowing freely. Here’s the fix:
Fill the reservoir with a mixture of one part white vinegar to two parts water. Run the brew cycle without a filter or coffee grounds. Once the cycle completes (it’ll take longer than usual — that’s normal), dump the vinegar solution and run two full cycles with clean water to rinse everything out. You don’t want your next cup tasting like a salad.
For stubborn buildup, Cuisinart’s own descaling solution works slightly better than vinegar because it’s formulated for the specific minerals that accumulate in coffee makers. You can find it on Amazon or at most home goods stores for about $8–10.
Check the Water Filter
If your Cuisinart model uses a charcoal water filter (the small cylindrical piece inside the reservoir), a clogged filter dramatically slows water flow. These filters should be replaced every 60 days or 60 uses, whichever comes first. When they get saturated, they essentially become a dam instead of a filter.
Some people don’t even realize their machine has a water filter because it came pre-installed and they never thought about it. Pop open the reservoir and check. If the filter looks dark, discolored, or feels slimy, it’s way overdue for a swap.
If you’re also dealing with a Keurig machine that’s giving you trouble, that descaling process is equally critical — mineral buildup doesn’t discriminate between brands.
Coffee Tastes Bad, Weak, or Bitter
Your machine brews fine, but the coffee itself tastes off. This problem drives people crazy because they blame the machine when the actual cause is usually something else entirely.
Weak, Watery Coffee
If your coffee tastes like slightly brown water, the coffee-to-water ratio is the first thing to check. The standard guideline is about 2 tablespoons of ground coffee per 6 ounces of water. A lot of people eyeball this and consistently under-dose. If you’re not sure about your measurements, a coffee scoop size guide can help you nail the right ratio.
Also, check your grind size. Pre-ground coffee that’s been sitting open for weeks loses its potency. Coffee grounds start going stale within 30 minutes of grinding — that’s not an exaggeration. If you’re using pre-ground, at least store it in an airtight container and use it within two weeks of opening.
The brew basket matters too. If the Cuisinart’s permanent gold-tone filter is damaged or sitting crooked, water can bypass the grounds entirely, running straight through without extracting flavor. Make sure the basket sits flush and flat.
Bitter, Harsh Coffee
Bitterness usually means over-extraction — the water spent too long in contact with the grounds or the water was too hot. On Cuisinart models with temperature control (like the DCC-3200P1), try dialing the temperature down one notch.
Old, stale coffee also tastes bitter. And here’s something people overlook: a dirty machine produces bitter coffee. Coffee oils build up on the brew basket, carafe, and internal components. These oils go rancid over time and taint every pot you brew. Wash the carafe, lid, and brew basket with warm soapy water after every use — not just a rinse, an actual wash.
Strange or “Off” Taste
If your coffee has a chemical, plasticky, or metallic taste, that’s different from weak or bitter. New machines sometimes produce a plasticky taste for the first few cycles — run 2-3 water-only brew cycles before making your first pot. If the taste shows up in an older machine, it’s often a sign that internal components are degrading, especially if the machine is more than 4-5 years old.
A vinegar taste after descaling means you didn’t rinse thoroughly enough. Run at least two — preferably three — full cycles with fresh water after every descaling session.
Cuisinart Coffee Maker Leaks or Overflows
Water or coffee pooling around the base of your machine, dripping from the brew basket, or overflowing from the carafe? Each leak scenario has a different cause.
Leaking From the Bottom
If water pools underneath the machine, the internal tubing might have a loose connection, or a seal has worn out. Before assuming the worst, check if the reservoir is cracked. Remove it (on models with a removable reservoir), fill it with water in your sink, and watch for drips. Even a hairline crack can cause a slow, steady leak.
Also check the carafe lid. On many Cuisinart models, the carafe lid has a specific orientation — it only seats correctly one way. If it’s rotated slightly off, it creates a gap that allows coffee to drip down the outside of the carafe and pool on the warming plate, making it look like the machine itself is leaking.
Overflowing From the Brew Basket
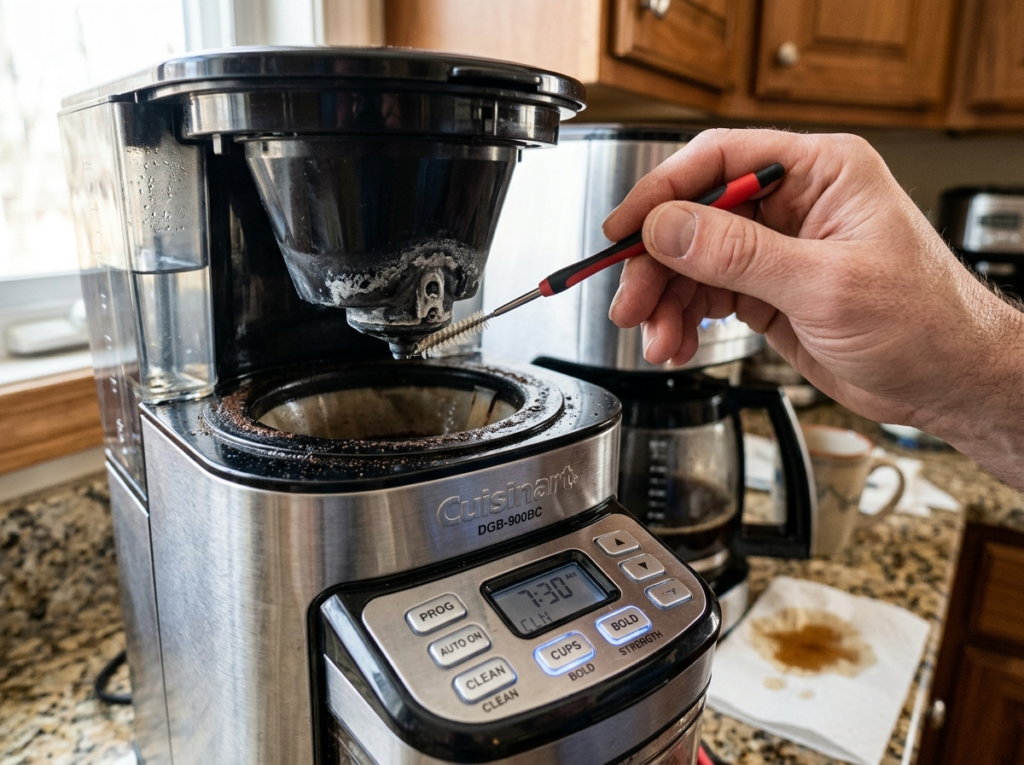
This is usually a clog. Coffee grounds — especially fine grinds — can block the small hole at the bottom of the brew basket. Remove the basket, clean the exit hole with a toothpick or thin brush, and rinse under running water.
Using too much coffee or too fine a grind can also cause overflow. Fine grounds compact during brewing, creating a dense puck that water can’t pass through fast enough. The water backs up, rises above the basket, and spills over the sides. Switch to a medium grind if you’re using fine, and make sure you’re not exceeding the basket’s capacity.
Pro Tip: If overflow happens only when you brew a full 12-cup pot but not with smaller amounts, your machine’s drip rate might be outpacing the basket’s drain rate due to partial clogging. Descale the machine and clean the showerhead (the part inside the lid that distributes water over the grounds). A clogged showerhead concentrates the water stream in one spot instead of spreading it evenly, which causes grounds to dam up.
The Machine Beeps But Won’t Brew
Your Cuisinart powers on, the display works, you can set the clock, program a brew time — but when you actually hit brew, it beeps a few times and does nothing. Or it starts and immediately stops.
The Reservoir Check
Most Cuisinart models have a sensor that prevents brewing if the water reservoir is below a minimum level. Even if you think there’s enough water, the sensor might disagree. Fill the reservoir to at least the 4-cup line and try again.
On some models, the reservoir needs to be seated in a very specific position for the sensor to register. Lift it out completely and place it back, pressing down firmly until you feel it click or settle into place.
The Carafe Position Sensor
Several Cuisinart models — particularly the thermal carafe versions — have a sensor on the warming plate that detects whether the carafe is in position. If the carafe isn’t sitting perfectly on the plate, the machine thinks it’s missing and refuses to brew. Clean the warming plate surface (coffee spills can interfere with the sensor), and make sure the carafe is pushed all the way back.
The Lid Lock
On Cuisinart single-serve and dual-purpose models (like the SS-15 and SS-20), the lid has a locking mechanism that must fully engage before brewing starts. If the lid hinge is dirty or the locking tab is worn, the machine won’t register it as closed. Clean the hinge area and close the lid firmly until you hear a definitive click.
The Grind & Brew Models: Special Troubleshooting
Cuisinart’s Grind & Brew machines (DGB-900BC, DGB-850, and similar models) combine a burr grinder with a drip brewer, which means they have a unique set of potential issues that standard drip models don’t share.
Grinder Jams
If the grinder makes a grinding noise but no coffee falls into the filter basket, the chute between the grinder and the basket is clogged. This happens when oils from the beans build up in the chute over time, or when a stray pebble or foreign object gets mixed in with your beans (it’s rare but it happens).
Unplug the machine, remove the grinder assembly according to your manual, and clear the chute with a small brush or wooden skewer. Never use metal tools — you can damage the burrs.
Inconsistent Grind
If your Grind & Brew starts producing uneven grounds — some coarse, some powdery — the burrs are likely dull or misaligned. Cuisinart’s burrs typically last about 3–5 years with regular use. You can order replacement burrs directly from Cuisinart’s website. It’s a straightforward swap that takes about 15 minutes.
Also, using oily, dark-roasted beans accelerates buildup inside the grinder. If you love dark roasts, clean the grinder assembly monthly. Run a tablespoon of uncooked white rice through the grinder once a month — it absorbs oils and knocks loose any stuck grounds. Just make sure to run a small batch of actual coffee beans through afterward to clear out any rice dust before brewing.
Cuisinart Thermal Carafe Issues
The thermal carafe models (DCC-3400, DCC-3750, and others) don’t have a warming plate — they rely on vacuum insulation to keep coffee hot. This design eliminates the burnt-coffee taste that comes from sitting on a hot plate, but it introduces its own quirks.
Coffee Doesn’t Stay Hot
If your coffee goes lukewarm within an hour, the thermal carafe’s vacuum seal might be compromised. Here’s a simple test: fill the carafe with boiling water, close the lid, and wait 2 hours. If the water is noticeably cool, the carafe’s insulation has failed. Unfortunately, there’s no way to repair a broken vacuum seal — you’ll need a replacement carafe. Cuisinart sells them individually, usually for $25–40 depending on the model.
One thing that helps even with a good carafe: preheat it before brewing. Fill it with hot tap water, let it sit for a minute, dump it, then start your brew. A cold carafe absorbs heat from your fresh coffee, dropping the temperature 10–15 degrees right off the bat.
Dripping From the Carafe Lid
Thermal carafe lids are more complex than regular carafe lids. They have a pour spout mechanism and a seal that prevents heat from escaping. If the silicone gasket inside the lid is worn, cracked, or caked with coffee residue, it won’t seal properly. Remove the gasket, clean it thoroughly, and inspect it. Replacement gaskets are available from Cuisinart.
If you’re considering an upgrade to an espresso setup instead, understanding the differences between machines like DeLonghi and Breville can help you decide whether a dedicated espresso machine fits your needs better.
Scheduled Brew Not Working
You set the timer the night before, expecting to wake up to fresh coffee, and… nothing happened. The clock is right. The brew time is set. But the machine just sat there.
The Programming Sequence
This trips up a surprising number of people. On most Cuisinart models, you can’t just set the clock and the brew time — you also have to press the “Auto On” button (or its equivalent) after setting the program time. If you don’t activate Auto On, the machine stores the time but doesn’t actually schedule the brew. The Auto On indicator light should be illuminated when the timer is properly armed.
Power Interruption
If your home experienced even a momentary power flicker during the night, the programmed brew time resets on models without battery backup. Some newer Cuisinart models have a backup battery (usually a CR2032 coin cell) inside the unit that preserves clock and timer settings during outages. If yours has one and the timer keeps resetting, the battery might be dead. Check your manual for the battery compartment location — it’s usually accessible from the bottom or back of the machine.
Water and Coffee Ready the Night Before
This might sound obvious, but the machine won’t brew if there aren’t grounds in the basket and water in the reservoir. If someone in your household used the machine after you set the timer, or if you forgot one of these steps, the machine might start the cycle but produce nothing — or abort the brew entirely.
How to Deep Clean Your Cuisinart (Step by Step)
Most Cuisinart problems don’t need a specific fix — they need a proper cleaning. If you haven’t done a thorough deep clean in a while, this process alone might resolve your issue, whatever it is.
Step 1: Empty the machine completely. Remove the water filter, the brew basket, and the carafe. Dump any old grounds and rinse everything with warm water.
Step 2: Mix your cleaning solution. Use either Cuisinart’s descaling solution or a 1:2 ratio of white vinegar to water. Fill the reservoir to the max line.
Step 3: Run a full brew cycle with the cleaning solution. Place the empty carafe on the warming plate but don’t put a filter or grounds in the basket. Let the full cycle complete.
Step 4: When the cycle finishes, let the machine sit for 15–20 minutes with the solution still in the carafe. This gives the acidic solution extra time to work on any deposits in the carafe itself.
Step 5: Pour out the solution and run at least two full cycles with fresh, clean water. Three cycles if you used vinegar and you’re sensitive to the taste.
Step 6: While the rinse cycles run, clean the external components. Wash the brew basket, carafe, and carafe lid with warm soapy water. Use a soft bottle brush inside the carafe to remove coffee oil residue. Clean the showerhead (under the brew basket lid) with an old toothbrush.
Step 7: Wipe down the warming plate with a damp cloth. Burned-on coffee drips can interfere with the carafe sensor and cause uneven heating.
If you also own a Breville espresso machine, the descaling process is a bit different — here’s how to descale a Breville properly.
Do this full cleaning routine once a month if you brew daily. Your machine will last years longer, and your coffee will taste noticeably better.
When to Stop Troubleshooting and Replace the Machine
Not every Cuisinart can be saved, and there’s a point where repair efforts stop making sense. Here’s how to know when you’ve reached it.
If your machine is less than 3 years old and still under Cuisinart’s limited warranty, contact their customer service before doing anything drastic. Cuisinart’s warranty covers manufacturing defects, and they’re generally reasonable about replacements. Keep your receipt or registration confirmation.
If the machine is older than 5 years, brews daily, and you’ve already descaled, cleaned, and reset multiple times without improvement, internal components may simply be worn out. Heating elements degrade. Pump mechanisms weaken. Seals dry out and crack. At some point, the machine owes you nothing.
A good rule of thumb: if the cost of replacement parts (carafe, filter basket, water filter housing) adds up to more than 50% of the price of a new machine, buy new. Cuisinart’s drip coffee makers range from about $50 to $200 depending on features, so you’re not looking at a massive investment.
If you’re exploring new machines, something like a dual coffee maker could be a smart upgrade — it gives you single-serve flexibility alongside full-pot brewing.
Quick Reference: Problem-to-Fix Cheat Sheet
Since you might be reading this with a broken coffee maker and zero patience for scrolling, here’s a rapid-fire reference:
Machine won’t turn on → Check outlet, GFCI reset, unplug for 30 minutes, hard reset.
Brews slowly or partial pot → Descale with vinegar, replace water filter, clean showerhead.
Coffee tastes bad → Clean machine, check grind size and freshness, use correct coffee-to-water ratio.
Leaking from bottom → Inspect reservoir for cracks, check carafe lid orientation, examine internal seals.
Error codes on display → Reseat lid/basket for Err 1, descale for Err 2/3, hard reset for Err 4.
Beeps but won’t brew → Fill reservoir above minimum, reseat carafe on warming plate, check lid lock.
Timer doesn’t start brew → Confirm Auto On is activated, check backup battery, verify water and grounds are loaded.
Frequently Asked Questions
How do I reset my Cuisinart coffee maker?
Unplug the machine from the wall outlet. Press and hold the power button for about 10 seconds while it’s unplugged — this drains residual charge from the internal circuits. Wait at least 60 seconds, then plug it back in. This soft reset clears most electronic glitches and is the single most effective troubleshooting step for Cuisinart brewers. If your model has an LCD display, you’ll need to reset the clock and any programmed brew times after doing this.
Why does my Cuisinart coffee maker keep shutting off during brewing?
The most likely cause is the auto-shutoff feature activating prematurely, which can happen after a power glitch resets the internal timer. It could also be the thermal safety switch triggering because of mineral buildup on the heating element — when the element can’t transfer heat efficiently through scale, it overheats and the safety circuit cuts power. A thorough descaling usually solves this. On models with adjustable auto-shutoff settings (like 0–4 hours), double-check that the setting hasn’t been accidentally changed to the shortest duration.
How often should I descale my Cuisinart coffee maker?
Cuisinart recommends every 3–6 months, but this depends heavily on your water hardness. If you have hard water (common in the Midwest and Southwest US), you might need to descale monthly. A good indicator: if your brew time has noticeably increased, or if the “Clean” light has come on, you’re overdue. Using filtered or bottled water slows mineral buildup significantly, but doesn’t eliminate it entirely. Even with soft water, descale at least twice a year to keep the internal components clear.
Can I use vinegar instead of Cuisinart’s descaling solution?
Yes, white vinegar works well for routine descaling. Use a 1:2 ratio — one part vinegar to two parts water. The main downside is that vinegar requires more rinse cycles afterward (at least 2–3 full reservoirs of clean water) to eliminate the taste and smell. Cuisinart’s branded solution and third-party citric acid-based descalers rinse out more cleanly and tend to be slightly more effective on heavy calcium deposits. For regular maintenance, vinegar is perfectly fine. For heavy buildup you can see or feel, a commercial descaler is worth the few extra dollars.
My Cuisinart coffee maker is making loud noises during brewing — is that normal?
Some noise during brewing is normal — you’ll typically hear the pump working and water sizzling as it hits the heating element. But if the noise has gotten significantly louder, or you’re hearing knocking, clicking, or grinding sounds that weren’t there before, that’s a sign of air in the water lines (often from running the machine with an empty or low reservoir) or pump strain caused by mineral buildup. Try running a descaling cycle first. If the noise started right after you moved or cleaned the machine, air might be trapped in the system — run a water-only cycle to purge it.
Your Cuisinart coffee maker is a pretty resilient piece of equipment, and most problems that seem terminal are actually just your machine’s way of asking for some basic maintenance. A good descaling, a thorough cleaning, and checking a few mechanical basics will solve the vast majority of issues people encounter.
Keep a simple schedule — descale regularly, replace the water filter every two months, wash the carafe and basket properly instead of just rinsing, and your brewer will keep delivering solid coffee for years. And honestly? Understanding how to measure your coffee properly makes just as big a difference to your morning cup as any machine fix ever will.
Now go get that coffee maker back to work. You’ve got mornings to conquer.